
Mechanics & Technology
A collection of various techniques, game mechanics, and speedrun technology, along with their correspoding explanations
Basic ControlsBack to Top
Default Control Scheme
All of the information presented on this site assumes the use of the default control scheme, as shown here:
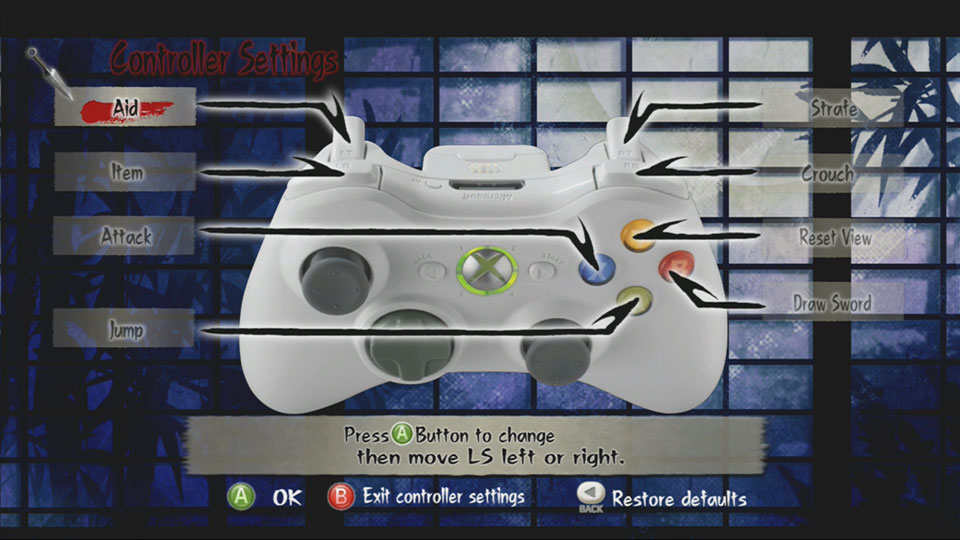
The buttons listed on that graphic can have their functions swapped around with others, but not all buttons can be remapped; most notably, the item selection and aiming fuctions cannot be changed. The buttons with such fixed actions are coverd below. To modify your control scheme, go to Options>Control Settings>Controller Settings.
Pause
Fairly self-explanatory and common use of the ![]() button. You can restart the current mission here, or quit out to the ninja village or mode select. This is useful to know for routing and/or testing more so than running.
button. You can restart the current mission here, or quit out to the ninja village or mode select. This is useful to know for routing and/or testing more so than running.
View Map
Pressing the ![]() button during a mission brings up an overlay of the map. While it isn't wildly accurate and typically doesn't show much information, it is critical to use in bomb retrieval missions, such as Mission 45. You can move and act normally with the map up, and overlay is somewhat transparent, but it can be difficult at times to see where you're going.
button during a mission brings up an overlay of the map. While it isn't wildly accurate and typically doesn't show much information, it is critical to use in bomb retrieval missions, such as Mission 45. You can move and act normally with the map up, and overlay is somewhat transparent, but it can be difficult at times to see where you're going.
Reset View
This is an action you can rebind in the Control Scheme window, but it isn't quite as useful as it initially seems. While the function is called Reset View, it only resets the camera's Y-axis (vertical position). It does not face the camera where your character is looking; instead, the ![]() is responsible for this action. By default, Reset View is bound to the
is responsible for this action. By default, Reset View is bound to the ![]() button.
button.
Select Item
You can change which item you have active by pressing left or right on the D-Pad (![]() ). Upon entering the mission, the Grappling Hook will be selected by default, regardless of any other items you have equipped.
). Upon entering the mission, the Grappling Hook will be selected by default, regardless of any other items you have equipped.
Aim Item/Peek
You can aim your currently selected item by pressing down on the ![]() stick. If it can be aimed, a targeting reticle will appear. Many items do not require aiming or cannot be aimed at all, such as Vanish or Dazzle. However, items such as the Grappling Hook require aiming before being used, and others are most effective when aimed ala Blowguns.
stick. If it can be aimed, a targeting reticle will appear. Many items do not require aiming or cannot be aimed at all, such as Vanish or Dazzle. However, items such as the Grappling Hook require aiming before being used, and others are most effective when aimed ala Blowguns.
While in front of a door (aka shoji), using this imput will instead peek through the door. This is very useful for surveying a room, but more importantly enables you to open a door with your sword drawn. This comes up huge in Missions 27 and 48.
Use Item
This is another action that can be rebound, but since the game simply calls it "Item", some extra explanation for clarity is in order. By default, pressing the ![]() will use/activate your currently selected item. As mentioned previously, the Grappling Hook requires aiming before it can be used.
will use/activate your currently selected item. As mentioned previously, the Grappling Hook requires aiming before it can be used.
General MechanicsBack to Top
The Ki Meter
The Ki Meter, sometimes referred to as the Lantern, is the most useful part of the HUD in this game. Its most basic function shows the player the status of nearby enemies and whether or not the player has been detected, and has a variety of other states. It glows a different color depending on whether or not you're detected, or if an enemy is in a search mode, sees something suspicious, on-alert, smells you, or actively sees you. By default, it glows green, indicating that you haven't been noticed, and displays a number next to it. This number is a proximity indicator that displays how close you are to an enemy character, with the number getting larger the closer you are to the enemy.
 Green - Sense
- Default state; undetected. Purple - Sound
- Curious. Triggered by nearby noise. The enemy will stop in place and begin turning towards the source of the sound. No heightened detection. Yellow - Sight
- Suspicious. Triggered by being seen near the edge of an enemy's vision range. Enemies in this state will slowly walk towards where they saw you and have slightly higher detection. Orange - Smell
- Smell. Triggered by being near a guard while afflicted by a distinct odor (blood, cesspool, stinkbomb, etc). Similar to Purple mode. Blue - Alert
- On Alert. Triggered by certain noise thresholds and finding bodies. You cannot Stealth Kill anyone who is in this mode. Enemies have much higher detection capabilities. Red - Alarm
- Detection. You've been detected and most enemies in the immediate vicinity are fully alert and will try to kill you. You cannot Stealth Kill any enemy who is in this mode.
Meter Colors and Modes:
Physical Abilities (Stats)
Physical Abilities are Tenchu Z's values for the ninja's base stats. A ninja has a Vitality, Strength, and Agility value between 0 and 100, with the maximum limit increasing periodically throughout the game: 150 maximum after completing Mission 17, and increased again to the hard cap of 200 upon completing Mission 37. The total points available to allocate also increases at the same intervals: 210 to start, 300 after Mission 17, and 420 after Mission 37.
Sound
Sound in Tenchu Z is a bit quirky, to say the least. There is a Sound meter on the left of the Ki Meter that indicates how loud you are currently, with the idea being that too much noise will alert nearby guards of your presence to varying degrees. This meter can be inaccurate, with some movements like the R-Dash seemingly looking as loud as running, yet has the pratical effect of catching the attention of nearby enemies in a surprisingly large radius. The opposite can be true; R-Jumps and Stealth Kills seem to make plenty of sound, but are considered silent in-game.
Mission Rankings
The Ninja ratings in Tenchu Z are tied directly to the amout of points scored in the mission.
- Ninja 5: 900 Points minimum
- Ninja 4: 700 Points minimum
- Ninja 3: 500 Points minimum
- Ninja 2: 300 Points minimum
- Ninja 1: less than 300 Points
Ninja Rankings Requirements
While the Any% category doesn't mandate any specific rating, Ninja 1 ratings are avoided as much as possible. This is due to the longer unskippable cutscene that accompanies this rating taking about five seconds longer than other ratings. For HN5, a Ninja 5 rating is required for all missions played. The next section will break down how the game calculates these point totals.
Specials & Score Calculations
Upon completing a Mission, you will be given a score based on various criteria and given Gold equal to your score. The gold amount is affected by a multiplier based on the difficulty setting: 0.9 for Easy, 1.0 for Normal, and 1.5 for Hard. In other words, playing on Easy difficulty applies a 10% gold penalty while Hard awards 50% more gold compared to Normal difficulty.
Consecutive SKs are valued somewhat strangely; we'll use an example of a typical Mission 1 and its two-man Consecutive SK. The first SK is counted as a "Normal SK" and valued at 100 points. The second SK is counted as a "Consecutive SK", and valued at 280 points. So, by eliminating two guards, we are awarded 380 points, which is nearly the value of four Normal SKs! This is why Mission 1 can be completed with that one Consecutive SK and the Boss SK, actually completing the level with 130 extra points. The exact points breakdown is like so:
- 1 Normal SK @ 100
- 1 Consecutive SK @ 280
- Undetected Bonus @ 150
- Itemless Bonus @ 100
- Uninjured Bonus @ 100
- Boss SK @ 300
- TOTAL: 1030 [Ninja 5]
Note that these Bonuses are listed in the results screen as "Specials", and can be viewed by pressing the ![]() .
.
Movement MechanicsBack to Top
Run
The most basic form of movement, controlled by the Left Stick. The speed of the run is dictated by the Agility stat of your character. Holding the Left Stick just past the deadzone will yield a tip-toe animation, similar to that of forward strafing. Note that an Agility stat less than 150 is slower than R-Dashing.
Roll
The fastest stealth movement in the game. Rolling in Tenchu Z is treated as a silent movement regardless of terrain and reduces your visibility significantly. It is also impossible to bonk into walls or other obstacles while rolling. Despite it being the fastest stealth movement in the game, it still ends up being slower than running and R-Dashing. In cases where silent movement isn't required, use those movement options instead.
A-Jump
A normal jump by pressing ![]() . The momentum can be affected by stick input. This jump without stick input is referred to as a Neutral Jump.
. The momentum can be affected by stick input. This jump without stick input is referred to as a Neutral Jump.
Strafe
Holding the ![]() and moving in any direction allows you to slowly move in that direction. Additionally, holding
and moving in any direction allows you to slowly move in that direction. Additionally, holding ![]() and rotating the camera with the Right Stick rotates the character and the camera together. This is the most useful form of the strafe mechanic, used primarily in Mission 37's HN5 route.
and rotating the camera with the Right Stick rotates the character and the camera together. This is the most useful form of the strafe mechanic, used primarily in Mission 37's HN5 route.
Dash
The fastest ground movement under 150 Agility. Press forward and ![]() while holding down the
while holding down the ![]() to Dash. This is the primary means of movement before completing Mission 37. While faster than rolling or running, it is also significantly louder in-game, which can be a detriment when dashing near enemies. This audio property is sometimes used advantageously to put certain key guards and bosses in Purple Ki meter. Dashing cannot be done near alerted enemies due to the
to Dash. This is the primary means of movement before completing Mission 37. While faster than rolling or running, it is also significantly louder in-game, which can be a detriment when dashing near enemies. This audio property is sometimes used advantageously to put certain key guards and bosses in Purple Ki meter. Dashing cannot be done near alerted enemies due to the ![]() also having the functionality of locking onto enemies.
also having the functionality of locking onto enemies.
Sidehop
Holding the ![]() and jumping with a left or right input will sidehop in that direction. Only currently useful in Mission 49's Any% and HN5 routes.
and jumping with a left or right input will sidehop in that direction. Only currently useful in Mission 49's Any% and HN5 routes.
Backflip
Same as above, but with a back stick input. It covers ground fairly quickly, but has a hefty recovery time and cannot be used to climb up terrain.
R-Jump
What the game refers to as a Moonsault, this techinque is performed by pressing ![]() +
+![]() with no stick input. After the R-Jump begins, Left Stick input can (and usually is) used to affect the trajectory of the jump, typically forward for increased distance. Perhaps the greatest benefit of this technique is the very quick landing recovery. This allows you to scale succeptible walls and almost immediately continue onwards upon landing. There are parts of the route that use R-Jumps to get over or onto certain walls and take advantage of the low recovery frames, such as Mission 8 and Mission 9.
with no stick input. After the R-Jump begins, Left Stick input can (and usually is) used to affect the trajectory of the jump, typically forward for increased distance. Perhaps the greatest benefit of this technique is the very quick landing recovery. This allows you to scale succeptible walls and almost immediately continue onwards upon landing. There are parts of the route that use R-Jumps to get over or onto certain walls and take advantage of the low recovery frames, such as Mission 8 and Mission 9.
Note that the ![]() is also responsible for facing the camera forward, so try to just tap this trigger when executing this jump. Otherwise, your camera will face the direction of your character during the twist and end up in the reverse direction of the beginning, which can be disorienting.
is also responsible for facing the camera forward, so try to just tap this trigger when executing this jump. Otherwise, your camera will face the direction of your character during the twist and end up in the reverse direction of the beginning, which can be disorienting.
[Show Tutorial Video] (May 13, 2021)
L-Jump
L-Jumps can cover a decently large amount of aerial distance fairly quickly, and the landing recovery can be canceled into a Dash or Roll. ![]() +
+![]() executes a basic L-Jump, with stick input modulating the momentum of the jump. L-Jumps are often used after an R-Jump as a means of a near instant turnaround.
executes a basic L-Jump, with stick input modulating the momentum of the jump. L-Jumps are often used after an R-Jump as a means of a near instant turnaround.
Crouch Slide
Crouch Slides are a glitched state in which the character appears to be in a crouching state, but can move at full running speed. During a running animation, by tapping ![]() , then
, then ![]() one frame later, a Crouch Slide can be started. Mechanically, the character has the same visibility of a running animation, but the audio profile of a crouch. This is effectively reversed from what would be useful and, as such, is not used in any speedrun route. Being spotted is typically a detriment, while audio is usually either irrelevant or leveraged advantageously. The Crouch Slide does not help with either of these factors.
one frame later, a Crouch Slide can be started. Mechanically, the character has the same visibility of a running animation, but the audio profile of a crouch. This is effectively reversed from what would be useful and, as such, is not used in any speedrun route. Being spotted is typically a detriment, while audio is usually either irrelevant or leveraged advantageously. The Crouch Slide does not help with either of these factors.
Stealth Kill MechanicsBack to Top
A Stealth Kill, typically shorthanded as SK, is the primary mechanic used to eliminate enemies. An SK is a one-shot kill, allowing quick disposal of enemy combatants, including most mission targets. An enemy cannot be SK'd if they are certain Lantern Modes, namely, Blue Flame and Red Flame modes. The only enemies who cannot be SK'd are Shigi and Nagayori, due to the fact that they are always in Blue or Red Flame mode.
An SK is performed by pressing the ![]() button near an enemy with the sword drawn while the Ninja Seal is circling the target (there is also heartbeat audio). Depending on various factors such as your stance as well as your positioning relative to the target, you will perform a specific SK. In a speedrun, certain SKs are favored over others, with some strat relying on performing specific SKs on critical targets to complete a level optimally.
button near an enemy with the sword drawn while the Ninja Seal is circling the target (there is also heartbeat audio). Depending on various factors such as your stance as well as your positioning relative to the target, you will perform a specific SK. In a speedrun, certain SKs are favored over others, with some strat relying on performing specific SKs on critical targets to complete a level optimally.
Uneven Terrain SK
An Uneven Terrain SK is a forced type of SK that occurs when you are at a different elevation than your target when you attempt to SK. Front SKs, Back SKs, and Side SKs will automatically become UTs if you are standing on terrain that isn't equal to the target. For a speedrun, it is best to avoid these SKs as much as possible, with some strats failing if such an SK does occur (such as Mission 8, or any other strict timing strats). To avoid a UT, you can try to move close enough to your target to reduce the elevation discrepency, or you can force a different type of SK that can't be converted into an Uneven Terrain SK. Crouch SKs, Aerial SKs, Choke SKs, Slash SKs, Dash SKs, and Corner SKs cannot transform into UTs. Of these, Slash SKs and Dash SKs are the fastest due to their inherent virtue of being the fastest SKs in the game. Otherwise, Crouch SKs and Aerial SKs are the most flexible methods to avoid UTs

Front SK
A standard SK that occurs when approaching from the front of the target. The Front SK is fairly slow, involving flipping the target over before executing. Given that the angle of approach for this SK to occur is very risky anyways, it probably will be one of the few viable SKs when charging an enemy.
Back SK
A standard SK that occurs when facing the back of an enemy. This is the fastest standard SK due to simply grabbing and stabbing. Aside from the non-Seal SKs, the Back SK is probably the fastest SK in the game, allowing a quick cancel to boot.
Right-Side SK
When executing an SK from the right of the target, you will grab the target briefly and slash diagonally downward, throwing the body right and slightly behind you. It is a fairly quick SK and doesn't lose too much time compared to faster methods.
Left-Side SK
When executing an SK from the left, you will shove the target, filp them over you, then snap their neck. This SK is very slow and should be avoided in virtually all situations.
Crouching SK
By performing an SK while crouched, you flip the enemy over and execute. This is faster than most SKs involving flips, but it is still fairly slow.
Choke SK
If you grab an enemy, you can either knock out or SK them. The SK stabs twice fairly quickly, with the downsides being the long recovery and that you need to invest the time to grab the enemy in the first place. It does have the benefit of going into the grab with an unsheathed sword and coming out of the SK with a drawn sword.
Aerial SK
An Aerial SK occurs when you SK a target while you are airborne. This SK will snap you directly behind the target if you're facing the target's back, and will turn the target around if approached from the front. The main benefits of this SK are to avoid Uneven Terrain SKs and the swiftness of conversion to a Consecutive SK.

Shoji SK
A Shoji SK is a stealth kill that stabs the target through a shoji, or sliding translucent door. This SK is done by pressing the X button in front of a shoji while a target is close enough to the shoji on the other side. Shoji SKs can be done on moving targets, but since proximity is a crucial factor, the window in which to SK is greatly reduced.
The primary benefit of the Shoji SK is the fact that you can kill an enemy in a room without actually opening the door, which eliminates the possibility of being seen by the target. Additionally, opening a door in Tenchu Z is actually rather clunky if the sword is drawn; you must peek into the room by clicking the Left Stick in while adjacent to the door, then press the X button to slide the shoji open, then run into the room and SK. Because of how time-consuming and finicky this can be, Shoji SKs are a much cleaner and faster way of dealing with certain room-dwelling enemies, such as the Mission 1 and Mission 2 bosses.
Slash SK
While most SKs involve pressing ![]() while the seal is showing, there are a few SKs that bypass these SKs and their subsequent animations entirely. Namely, the Slash SK, R-Dash SK, and Aerial Slash SK all avoid the usual animations of SKs and allow very quick dispatching of enemy combatants.
while the seal is showing, there are a few SKs that bypass these SKs and their subsequent animations entirely. Namely, the Slash SK, R-Dash SK, and Aerial Slash SK all avoid the usual animations of SKs and allow very quick dispatching of enemy combatants.
More coming soon!

Aerial Slash SK
By pressing ![]() while airborne, you will slash in a arc forward. If executed correctly, you can Slash SK enemies while in a jump. The timing for this tech is pretty tricky on its own, but is compounded by the awkwardly small hurtbox produced by this slash. The landing recovery is also quite slow, which pushes this method to fringe case use. Currently, only Mission 26 sees common use of this technique.
while airborne, you will slash in a arc forward. If executed correctly, you can Slash SK enemies while in a jump. The timing for this tech is pretty tricky on its own, but is compounded by the awkwardly small hurtbox produced by this slash. The landing recovery is also quite slow, which pushes this method to fringe case use. Currently, only Mission 26 sees common use of this technique.
Dash SK
By pressing ![]() while executing an R-Dash, you will stab forward. This technique behaves similarly to a Slash SK, has the longest effective range of all SKs, and is ideal for getting an SK over a greater distance. The primary downsides are the very narrow hurtbox and the longer than average recovery animation. Note that an R-Dash SK will toss the target forward quite a distance, so keep this in mind for level that require more precise body placement.
while executing an R-Dash, you will stab forward. This technique behaves similarly to a Slash SK, has the longest effective range of all SKs, and is ideal for getting an SK over a greater distance. The primary downsides are the very narrow hurtbox and the longer than average recovery animation. Note that an R-Dash SK will toss the target forward quite a distance, so keep this in mind for level that require more precise body placement.
Consecutive SK
A Consecutive SK is performed by pressing the ![]() button while another SK is being performed if there is an appropriate adjacent target. The Ninja Seal will flash breifly when this technique can be executed. The timing between the different SKs varies, with a Back SK seemingly having the most lax timing and SKs such as Left SKs being very tight. Generally, we just mash the button upon beginning the inital SK.
button while another SK is being performed if there is an appropriate adjacent target. The Ninja Seal will flash breifly when this technique can be executed. The timing between the different SKs varies, with a Back SK seemingly having the most lax timing and SKs such as Left SKs being very tight. Generally, we just mash the button upon beginning the inital SK.
The example below shows an Aerial SK linked into a Consecutive SK, which also demonstrates how quickly Aerial SKs can be converted into Consecutives.

Cling SK
An SK performed while sidling a wall. Currently has no use in any speedrun route, since it is generally slow and has a short kill range.
Ledge SK
An SK that can be used while hanging off of a ledge under an enemy. Currently has no use in any speedrun route.
Ceiling SK
A unique type of SK that can only be used in conjuction with a special ceiling technique that can be bought in the shop. Currently has no use in any speedrun route.
Non-Stealth CombatBack to Top
Combat conducted outside of stealth is fairly clunky in this game. Unlike Stealth Kills, which are very fast and efficient, engaging in a sword fight is time-consuming and largely inefficient.
Slash, 3-Strike Combo, & 4-Strike Combo
Pressing the ![]() Button will slash your sword, which is intended as the bread and butter method of fighting bosses. The primary use of slashing in speedruns is for Slash SKs as mentioned in the previous section. Additionally, slashes can be used to quickly move through doors by cutting through them.
Button will slash your sword, which is intended as the bread and butter method of fighting bosses. The primary use of slashing in speedruns is for Slash SKs as mentioned in the previous section. Additionally, slashes can be used to quickly move through doors by cutting through them.
By default, the 3-Strike Combo will be equipped to your character, performed with three ![]() button presses. The first and second slashes can be cancelled into another Triple Combo ad nauseum, but the timing is quite strict (referred to as Infinite Slashes). This can be used to great effect when brawling Nagayori on the final stage. Alternatively, doing two full 3-Strike Combo Combos consecutively will break through an enemy's block, which can be very useful.
button presses. The first and second slashes can be cancelled into another Triple Combo ad nauseum, but the timing is quite strict (referred to as Infinite Slashes). This can be used to great effect when brawling Nagayori on the final stage. Alternatively, doing two full 3-Strike Combo Combos consecutively will break through an enemy's block, which can be very useful.
There is a 4-Strike Combo available in the game, but it is currently unused. It replaces the 3-Strike Combo Combo with four slashes in quick succession that do less damage per hit. Because it would take extra menuing to swap to this mode and it's not as useful for Infinite Slashes, 4-Strike Combos are unused.
Infinite Slashes
Infinite Slashes are an extension of the XA slash cancel built into the game. The core idea is that a slash can be cancelled into another slash, which can be repeated indefinitely to stunlock any enemy or boss. For optimal damage, the first two slashes of a 3-Strike Combo are looped for Infinite Slashes. This is done by pressing ![]() +
+![]() and holding
and holding ![]() . On a specific frame, press
. On a specific frame, press ![]() to cancel the second slash into another 1st slash, releasing
to cancel the second slash into another 1st slash, releasing ![]() after this slash begins. This trick is frame-perfect and is usually performed mostly by rhythm, but there is at least somewhat of a visual aspect.
after this slash begins. This trick is frame-perfect and is usually performed mostly by rhythm, but there is at least somewhat of a visual aspect.
Infinite Slashes are the optimal way of dealing with Nagayori in Mission 50. They also find use for normal enemies or assassination targets as a backup in case of detection.
[Show Example Video] (March 02, 2022)
Aerial Slash
Aerial Slashes are performed by slashing the sword while airborne. They are currently only useful for Aerial Slash SKs. Their hefty recovery time and mediocre damage makes them terrible for active combat situations.
Crouch Slash
While crouched, pressing the ![]() will perform an upward slash. It has less range than a standing slash and is uncancelable, but has a massive amount of knockback. This is leveraged to great effect in Mission 17 to knock Shigi into the water during the first bossfight of the game. It currently has no other use.
will perform an upward slash. It has less range than a standing slash and is uncancelable, but has a massive amount of knockback. This is leveraged to great effect in Mission 17 to knock Shigi into the water during the first bossfight of the game. It currently has no other use.
Dash Stab
This is the same move used for Dash SKs. However, it is incredibly detrimental to use in open combat. The stab does mediocre damage and forces a knock-down, which is a massive problem due to being unable to strike downed enemies with anything aside from the Ground Stab. With the very rare exception, avoid using this technique at all costs in combat.
Ground Stab
Stabs directly downward at a knocked-down enemy, doing low damage and having hefty startup and recovery frames. The startup is so slow that the Ground Stab often misses the target as enemies getting up from being downed are invulnerable. Ideally, Ground Stabs should never be used, since enemies shouldn't ever be alive and downed. Even if they are knocked down, a Ground Stab often isn't worth going for. In some timing situations, it can open you up to counter-attack.
Crescent Slash
Performed by a 360 rotation of the Left Stick + ![]() , a Crescent Slash appears to strike in a horizonal arc around the player. However, the hitbox for this attack is only a narrow section directly in front of the player. Factoring in the horrendously slow startup and recovery frames, Crescent Slashes should be avoided.
, a Crescent Slash appears to strike in a horizonal arc around the player. However, the hitbox for this attack is only a narrow section directly in front of the player. Factoring in the horrendously slow startup and recovery frames, Crescent Slashes should be avoided.
Downward Slash
A Downward Slash is a unique overhead sword swing achieved by simultaneously pressing Left Stick Down + ![]() while holding
while holding ![]() . It is a decently quick attack that can guard break when repeatedly used, which shows much more promise than most other standard combat options. However, it currently does not see play.
. It is a decently quick attack that can guard break when repeatedly used, which shows much more promise than most other standard combat options. However, it currently does not see play.
R-Targeting
While fighting an alerted enemy, you can lock on to them by holding down ![]() . It's mostly used by tapping the button to quickly set the camera on a target, since the premier combat method (Infinite Slashes) does not rely on R-Targeting at all.
. It's mostly used by tapping the button to quickly set the camera on a target, since the premier combat method (Infinite Slashes) does not rely on R-Targeting at all.
Blocking
Holding ![]() and
and ![]() will put you in a defensive stance, with or without a drawn sword. It can be broken with too many heavy attacks from enemies, but can be very useful for blocking one string of attacks. It's also possible to block by just holding
will put you in a defensive stance, with or without a drawn sword. It can be broken with too many heavy attacks from enemies, but can be very useful for blocking one string of attacks. It's also possible to block by just holding ![]() with a drawn sword, but it's not particularly useful.
with a drawn sword, but it's not particularly useful.
Relevant ItemsBack to Top
Grapple Hook
The default item that is always equipped, the Grapple Hook allows you to zip up to high ledged and rooftops. It can be used both on land and in water, but cannot be used while airborne. The Grapple Hook cannot be used offensively, and only serves as a utility tool. It's quite slow to use, somewhat finicky to aim, and has limited range, thus limiting its usefulness to a handful of stages (Mission 27 Any%, Mission 22 AM, Mission 50, etc)
If you incorrectly launch the Grapple Hook, it can be cancelled while your character is zipping up by pressing ![]() .
.
Shuriken
The Shuriken is a ranged throwing star. It does mediocre damage and is very underwhelming in combat. In a speedrun, Shurikens are instead relegated to a utility role. Specifically, in Mission 16, we use Shurikens to tactically alert Echigoya at specific spots in his cycle. Throwing this item near Echigoya immediately puts him in Blue Ki Mode, causing him to be alerted at run along his set path. This hurries up what essentially was an auto-scroller, and saves a huge amount of time. Click Here to see this strat in action.
While other items can have similar effects on that mission, they aren't as precise. Despite a new game file having 5 Shuriken available from the beginning, it takes at least 6.5 seconds to equip them. This is slower than simply picking up Shuriken in Mission 16 as needed.
Vanishing
The Vanishing item renders the user invisible after a slight delay. The effect dissipates after about 15 seconds or if you SK an enemy. Primarily designed for running past guards without detection and setting up a critical Stealth Kills. However, non-standard SKs such as Slask SKs and Dash SKs DO NOT break the invisibility effect. This means that, within the duration of the Vanish, you can SK without limit assuming you use those SK types.
You can learn more about this glitch in the Vanish Slash SKs tab, under the General Technology section, by clicking here.
Blowgun
Blowguns are arguably the most powerful item in the game, in contention with Vanishings. Blowguns are a ranged weapon that one-shot any non-alerted enemy struck, including assassination targets. They can auto-target by holding ![]() , have a huge effective range, and fire silently. This allows for far more efficient Elimination Missions (46 and 48) as well as Mission 45's HN5 strats.
, have a huge effective range, and fire silently. This allows for far more efficient Elimination Missions (46 and 48) as well as Mission 45's HN5 strats.
The downsides are relatively minor. You can only equip five Blowguns at a time, they are somewhat slow to fire, and they tend to alert enemies near the struck target. Additionally, any enemy in Blue or Red meter states will not go down to a single shot, and will instead be poisoned (which does pitifully low damage in this game). Regardless, the Blowgun is a staple item in all Speedrun categories due to its unrivaled power and range.
Burst Box
The Burst Box is the only explosive used in speedruns. This item acts similarly to a claymore, triggered by proximity and doing decent damage in the direction its facing. As usual with combat items, Burst Boxes are used for their utility instead of their damage. The primary benefit of Burst Boxes is their large knock-back, which enables a very effective Shigi drowning strat in Mission 50. The first Burst Box knocks Shigi down one roof level, then you can roll him off of the roof to the ground. One more roll will force him into the moat. If he gets up before you can push him into the water, a second Burst Box can be used. Additionally, a Burst Box can be used to execute Nagayori at low health in the event that an Infinite Slash sequence is accidentally dropped.
Bow
The Bow is an item that fires a fairly slow arrow projectile in an arc. A Bow cannot be purchased in the shop and can only be picked up by looting Archers. The Bow is relevant in all Mission 16 routes since it allows for no prior item equipment, saving roughly 7 seconds on its own. The arrow striking buildings and terrain adjacent to Echigoya cause him to enter Blue Meter status and run along his preset route, dramatically speeding up the stage (similar to Shurikens).
General TechnologyBack to Top
Stealth Kill Cancels
All Stealth Kills have recovery animations, and most can be canceled to allow for earlier movement afterward. In all instances, holding down Crouch (![]() ) until you see your character begin to crouch, then releasing the bumper will cancel the recovery frames to various degrees. Only the Uneven Terrain SK cannot be canceled in any appreciable way.
) until you see your character begin to crouch, then releasing the bumper will cancel the recovery frames to various degrees. Only the Uneven Terrain SK cannot be canceled in any appreciable way.
Slash Cancels
While an uncanceled Slash SK is faster than any standard SK, these slashes can be made faster yet. Slash SKs can be canceled with A-Jumps and any ![]() +
+![]() Movement sequence. However, there are two special types of Cancels that extend beyond manual dashes.
Movement sequence. However, there are two special types of Cancels that extend beyond manual dashes.
X-A Cancels
The X-A Cancel is a unique type of Slash Cancel performed by holding ![]() shortly after Slashing with
shortly after Slashing with ![]() . This will execute a seemingly frame-perfect R-Dash to cancel the Slash animation. If no stick inputs are applied, this R-Dash will always go in the direction the character is facing, regardless of camera position.
. This will execute a seemingly frame-perfect R-Dash to cancel the Slash animation. If no stick inputs are applied, this R-Dash will always go in the direction the character is facing, regardless of camera position.
X-X-A Cancels
An extension of the X-A Cancel, this is more commonly known as an Infinite Slash due to XXAs being infinitely chainable to each other. However, the timing to link these cancels together is frame-perfect. See the Infinite Slash entry in the Non-Stealth Combat section for more info.
XAC Cancels
An extension to the X-A Cancel, XAC Cancels stop the given Dash with a Crouch. This allows for very fast Slash SK conversions and allows for much more utility and safety. Holding ![]() along with
along with ![]() shortly after Slashing with
shortly after Slashing with ![]() . Due to how quickly this cancel cycles, it is very possible to recover a whiffed slash by repositioning and attempting another Slash or Standard SK.
. Due to how quickly this cancel cycles, it is very possible to recover a whiffed slash by repositioning and attempting another Slash or Standard SK.
[Show Video]
Vanishing Slash SKs
While the Vanishing item is active, you can retain the invisibility and SK enemies if non-standard SKs are used, such as Slash SKs or Dash SKs. See the later sections of Mission 48 for examples of this exploit in effect, found by clicking here.
Grapple Cancel
It is possible to cancel a Grapple by pressing the Use Item button while traveling. This stops your upward trajectory and does a small backflip back down. Largely useless at the moment.
MiscellaneousBack to Top
Skills, Secret Arts, and Combos
As it stands, there are no relevant Skills, Secret Arts, or Combos in any current route. Most useful or powerful Skills/Arts are unlocked after hundreds of Stealth Kills, totals that are not reached even in All Missions speedruns.